
Christmas is about spending time with family and friends. It’s about creating happy memories that will last a lifetime. Merry Christmas to you and your family!
Christmas is about spending time with family and friends. It’s about creating happy memories that will last a lifetime. Merry Christmas to you and your family!

The International Baccalaureate® (IB) provides a wide range of useful resources for candidate schools.
Our resources section tells you what you need to know about the IB, the IB curriculum, all of our courses, and school requirements for authorization.
The resources are primarily for schools wishing to become authorized. Existing IB World Schools should refer to the online curriculum centre (OCC) for resources and support.
Resources are split into the following sections:
Read through the resource library.
An A-Z guide to everything you need to know about the IB, from candidate schools to verification visits.
Explore our glossary of terms.

Cambridge Global Perspectives is a unique, transformational programme that helps students at every stage of school education develop outstanding transferable skills, including critical thinking, research and collaboration.
This innovative and stimulating skills-based programme places academic study in a practical, real-world context. It gives students aged 5 to 19 years the opportunity to develop the skills that they need to be successful at school and university as well as in their future careers.
The programme taps into the way today’s students enjoy learning, including group work, seminars, projects and working with other students around the world. The emphasis is on developing students’ ability to think critically about a range of global issues where there is always more than one point of view.
http://www.cambridgeinternational.org/programmes-and-qualifications/cambridge-global-perspectives/
Each centre taking our exams is given specific Key Times based on their country and location, when all candidates taking timetabled exams must be either in an exam or under Full Centre Supervision. Please see the relevant Cambridge Handbook for further information on Key Times and Full Centre Supervision.
http://www.cambridgeinternation al.org/cambridge-for/exams-officers/cambridge-exams-officers-guide/phase-1-preparation/timetabling-exams/key-times/

The Lifting Ice Cube Experiment is a trick that will let you lift ice cubes without getting your hands wet or making use of a spoon! You don’t believe it is possible? With science, nothing is impossible!
The Lifting Ice Cube experiment demonstrates the melting and freezing properties of water, which results to another property of matter called adherence. Adherence refers to close physical attachment or union of two objects. To further understand this phenomenon, let us do an experiment!
In this experiment, you will need the following materials:
Drop an ice cube in the glass of water. Take the string and dangle the end of it on the ice cube, and then keep it still.
While the string is dangled down onto the ice cube, sprinkle a bit of salt on the ice cube. Set aside for a few minutes. After some time, try to lift the string and observe what happens to the ice cube.
In the Lifting Ice Cube experiment, notice that adding salt onto the ice cube caused it to attach itself to the string, allowing you to lift it out of the glass just with the use of the string; like fishing! Read on to find out how this happened.
Before we explain how this happened, let us talk about the freezing point of water first, and the melting point of ice. The freezing point of water and the melting point of ice under normal conditions is 0°C or 32°F.
When you placed the ice cube in the glass of water, two processes started to occur: the ice started melting into the water and the water started to freeze. Because the two processes have been happening simultaneously, we can say that the ice and the water are in dynamic equilibrium. Here, the rate of freezing and the rate of melting is the same. As ice melts, the ice molecules begin to escape into the water. On the other hand, when the water freezes, its molecules are captured on the ice surface. With this happening at the same time, it is safe to say that there are no changes created in either the ice or the water. This state of equilibrium shall stay as long as the water keeps its temperature of 0°C (32°F).
When we sprinkle salt on to the ice cube, the state of equilibrium is disrupted. The salt molecules dissolve and join the water molecules thus changing the water’s rate of freezing. The rate of melting is now much faster than freezing hence causing the ice to melt. However, to be able to restore equilibrium, the water’s freezing point drops causing the ice to freeze out of the salt water. The salt starts to crystallize and ice refreezes around the string. This causes the ice cube to stick to the ends of the thread enabling you to pick it up just by lifting the string!
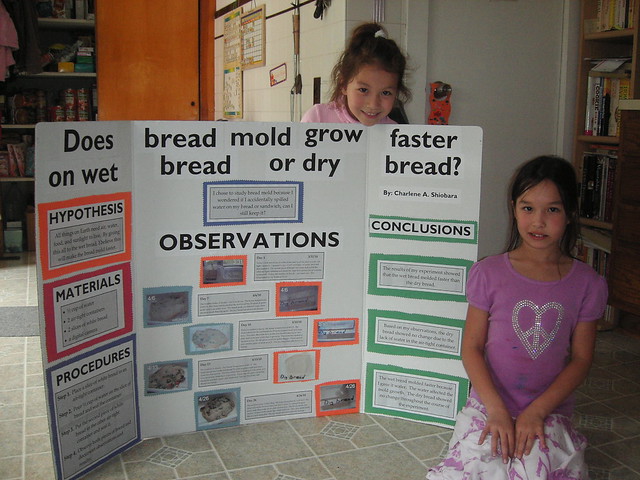
In the Mold Bread Experiment we are trying to prove that;
“Mold grows quicker at higher temperatures.”(Hypothesis)
Every 24 hours, preferably at exactly the same time every day, using the plastic grid, count the number of square centimeters of mold on each slice of bread. If the mold covers more than half a square, count it as 1cm, if less than half a square, count as 0 cm. You must never open the bags.
Because each square of bread is 100 cm2, you can express your results as a percentage. For each of the bread types, A, B or C average the amount of mold grown over the ten days and write these figures into a table.
You can then plot this information onto a graph and begin to explore your results. You can plot the amount of mold on each bread sample and compare it to the number of days, like in the diagram below. This can be done with a sheet of graph paper and colored pens or on a computer.
The A Level (Advanced Level) is a subject-based qualification conferred as part of the General Certificate of Education, as well as a school leaving qualification offered by the educational bodies in the United Kingdom and the educational authorities of British Crown dependencies to students completing secondary or pre-university education. A number of countries, including Singapore, Kenya, Mauritius and Zimbabwe have developed qualifications with the same name as and a similar format to the British A Levels. Obtaining A Level or equivalent qualifications is generally required for university entrance, with universities granting conditional offers based on grades achieved.
![]()
After all your hard work and study, exam day is when you have the opportunity to show what you have learnt. It’s important to make sure you understand what will happen on the day, so that you can perform as well as you possibly can.
http://www.cambridgeinternational.org/cambridge-for/parents-and-students/exams-and-results/
Theory of knowledge (TOK) is assessed through an oral presentation and a 1,600 word essay. It asks students to reflect on the nature of knowledge, and on how we know what we claim to know. TOK is part of the International Baccalaureate® (IB) Diploma Programme (DP) core, and is mandatory for all students.
http://www.ibo.org/programmes/diploma-programme/curriculum/theory-of-knowledge/

